Brewing: Barley + Water + Heat + Yeast + Time = Beer
Brewing and physics go way back. Way, way back. Like 10,000 years back. We don't know many details about those early days, but in more recent times brewers have carefully used empiricism to improve their brews: They learned that different brews resulted from warm (top-fermenting) and cold (bottom-fermenting) brewing. They learned that adding foam from a previous brew sped up fermentation. They perfected recipes, cultivated propriety strains of yeast, and squeezed every bit of efficiency out of the brewing process to make a profitable business out of it. Commercial refrigeration was even first tested by Carl Von Linde at a Munich brewery.
We are more concerned with the physics driving some of the fundamental brewing processes: yeast population dynamics, thermodynamics, and bubbles.
For our sample brew, we will need the following ingredients:
- 4 oz of hops for bittering
- 1 oz of hops for aroma
- 8 lbs of pale malted barley as the base
- 1/2 lbs of crystal malt barley for body
- 2 oz of black malt (which is too toasted to be fermentable) for color
- 1 lbs of corn sugar
- 2 7 g sachets of dry yeast
- Lots of water
Through a careful application of physics, we can turn these ingredients into a top-fermenting, English-style beer.


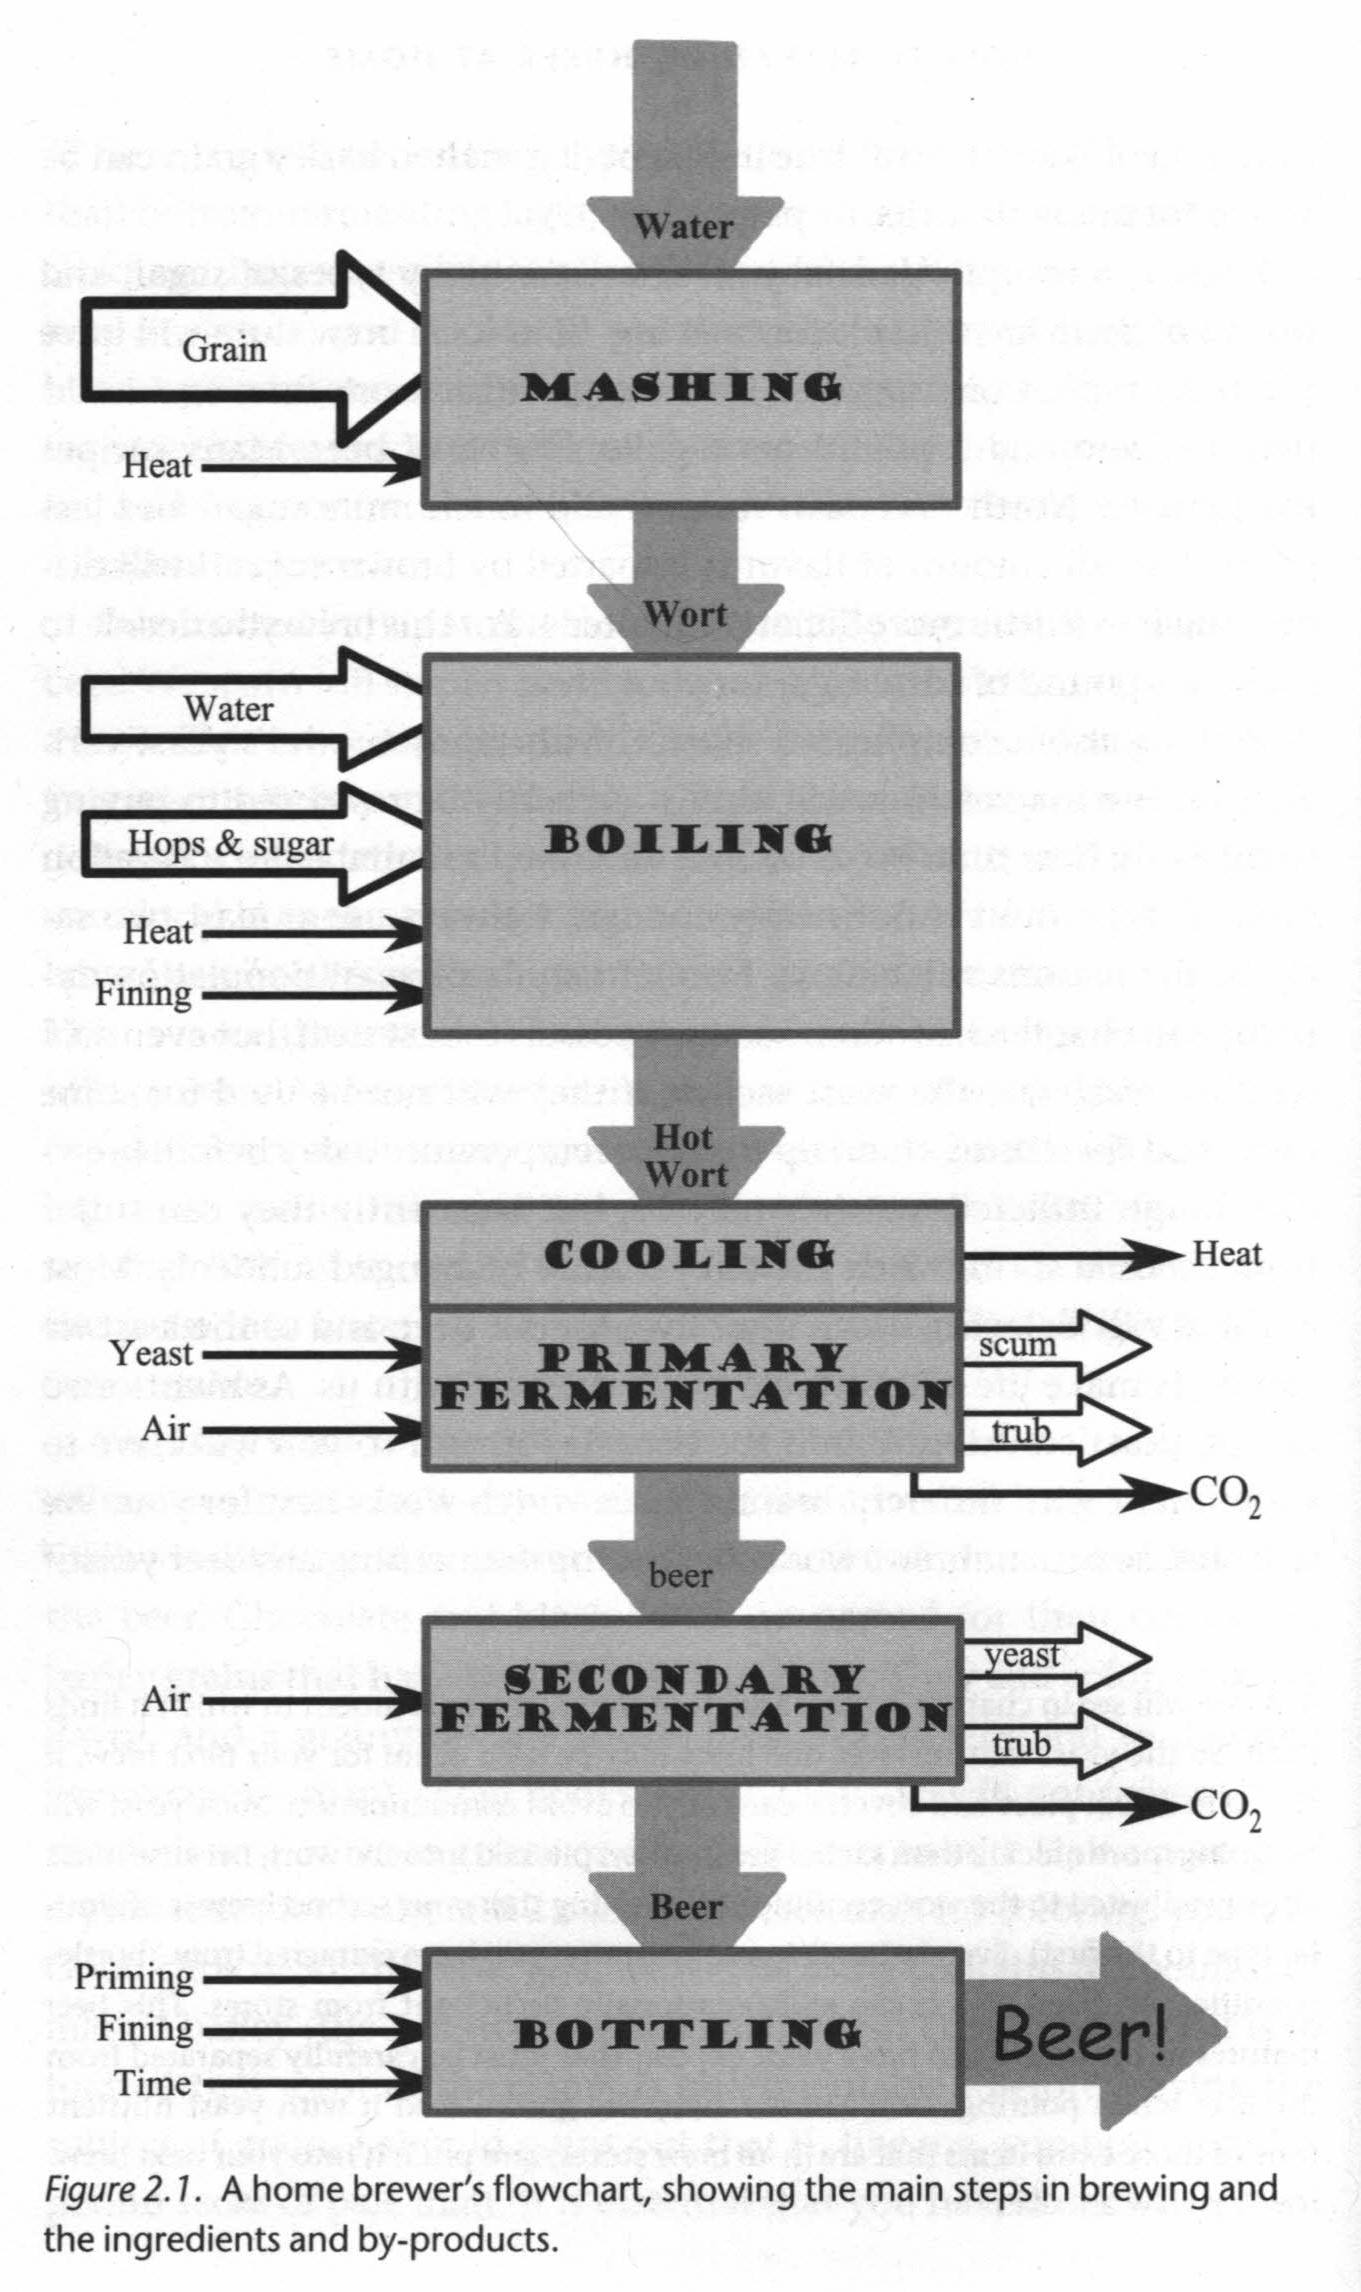
Mashing
Our first task is to get the fermentable sugars out of the 8.5 lbs (3.86 kg) of barley. We do this by cracking the grain to expose the starchy insides then placing it in a fermentation bucket with some warm water. This is our first example of thermodynamics in action, and this infusion method of mashing, what we call the grain and water mixture, can be quite demanding if we want it to be:
- Raise the mash temperature to 35-38°C (95-100°F) and hold for 30 minutes.
- Raise the mash temperature to 45°C (113°F) and hold for 60 minutes.
- Raise the mash temperature to 57°C (135°F) and hold for 20-30 minutes.
- Raise the mash temperature to 65°C (150°F) and hold for 45-60 minutes.
- Raise the mash temperature to 77°C (170°F) and hold for 10 minutes.
Or we can follow a much simpler two-step approach which still has good results:
- Raise the mash temperature to 100-120°F and hold for 30 minutes.
- Raise the mash temperature to 145-155°F and hold for 60-90 minutes.
We do this by adding 3-4 gallons of 150°F water to the cracked barley then adding 2-3 more gallons of boiling water for the second phase. The end result is six gallons of mash which we drain to get the sticky, sugary, warm wort. We dispose of the leftover grain and use the wort for brewing.
If you are interested in some of mashing's potential complexity, David Heath has a great introduction on different mash steps:
Boiling
This stage is more applied thermodynamics, but it is much simpler: Boil the wort for an hour or two. Add the bittering hops at the start of the boil, the aromatic hops 10-15 minutes before the end, and the sugar a few minutes before the end.
This has a few beneficial effects:
- Kills any unwanted microbes in the wort.
- Extracts bittering acids from the hops.
- It makes undesirable proteins drop out of the wort.
Fermentation
After the boiling and removing the hops, we let the wort cool to a more yeast-friendly temperature. Body temperature (37°C or 98°F) seems to work and 24-29°C (75-85°F) is safer. We also aerate the wort, purposefully mixing oxygen into it, so that the yeast we're going to add have everything they need for respiration. After tossing in the two sachets of primary yeast, the goal of primary fermentation is to maintain the temperature around 20°C (68°F) for two to six days while the yeast do their thing.
For secondary fermentation, once the yeast has consumed the easy resources and things are slowing down, we transfer the wort to an air-tight carboy, instead of the fermentation bucket, to reduce the risk of contamination. It also gets the wort off of the trub, the sediment comprised of unwanted proteins and dead yeast, in the bottom of the fermentation bucket.
There is not much work for us to do here, but the yeast population dynamics are interesting on their own.


Bottling
The last stage of brewing, bottling, is labor-intensive but perhaps not of much interest to amateur physicists. We put a little priming sugar in each of the 1 L bottles to give the remaining yeast something to eat and thus increase the alcohol and carbonation (condition) the bottles a list. Then we let them sit for at least three weeks before drinking (which is the interesting part).
All-Grain Brewing
It is worth pointing out that most homebrewers start with "extract" brewing or use a starter kit. We aren't doing that. We're diving into all-grain brewing since the science is more interesting and it produces better beer. If this is something that interests you, this video by Maltcast goes into great detail.